Pages

seeking & creating : researching & discovering : applying & practicing

sustainability in design = changing mindsets + deeds
Showing posts with label Adel's Projects. Show all posts

Tuesday, April 21, 2015

Eleven Mutant Baby Doilies/Bejewelled Scabs - Conceptual Shoot


Concept: Imagining luxury fashion techniques applied as a luxurious skin disease or the idea of luxury fashion and cosmetics as a skin disease, death/disease/decay vs. embellishment/decoration/beautification.
Materials: kimono fabric scraps, crocheted 100% wool yarn, beads/semi-precious stones, applied with scar make-up on skin
Freehand machine embroidery and beading by Allison Bell
Beading and crochet by Adel Ng
Photography and post-production: Mel T
Make-up by: Nicki
Models: JacintaKat, Jess

Monday, January 20, 2014

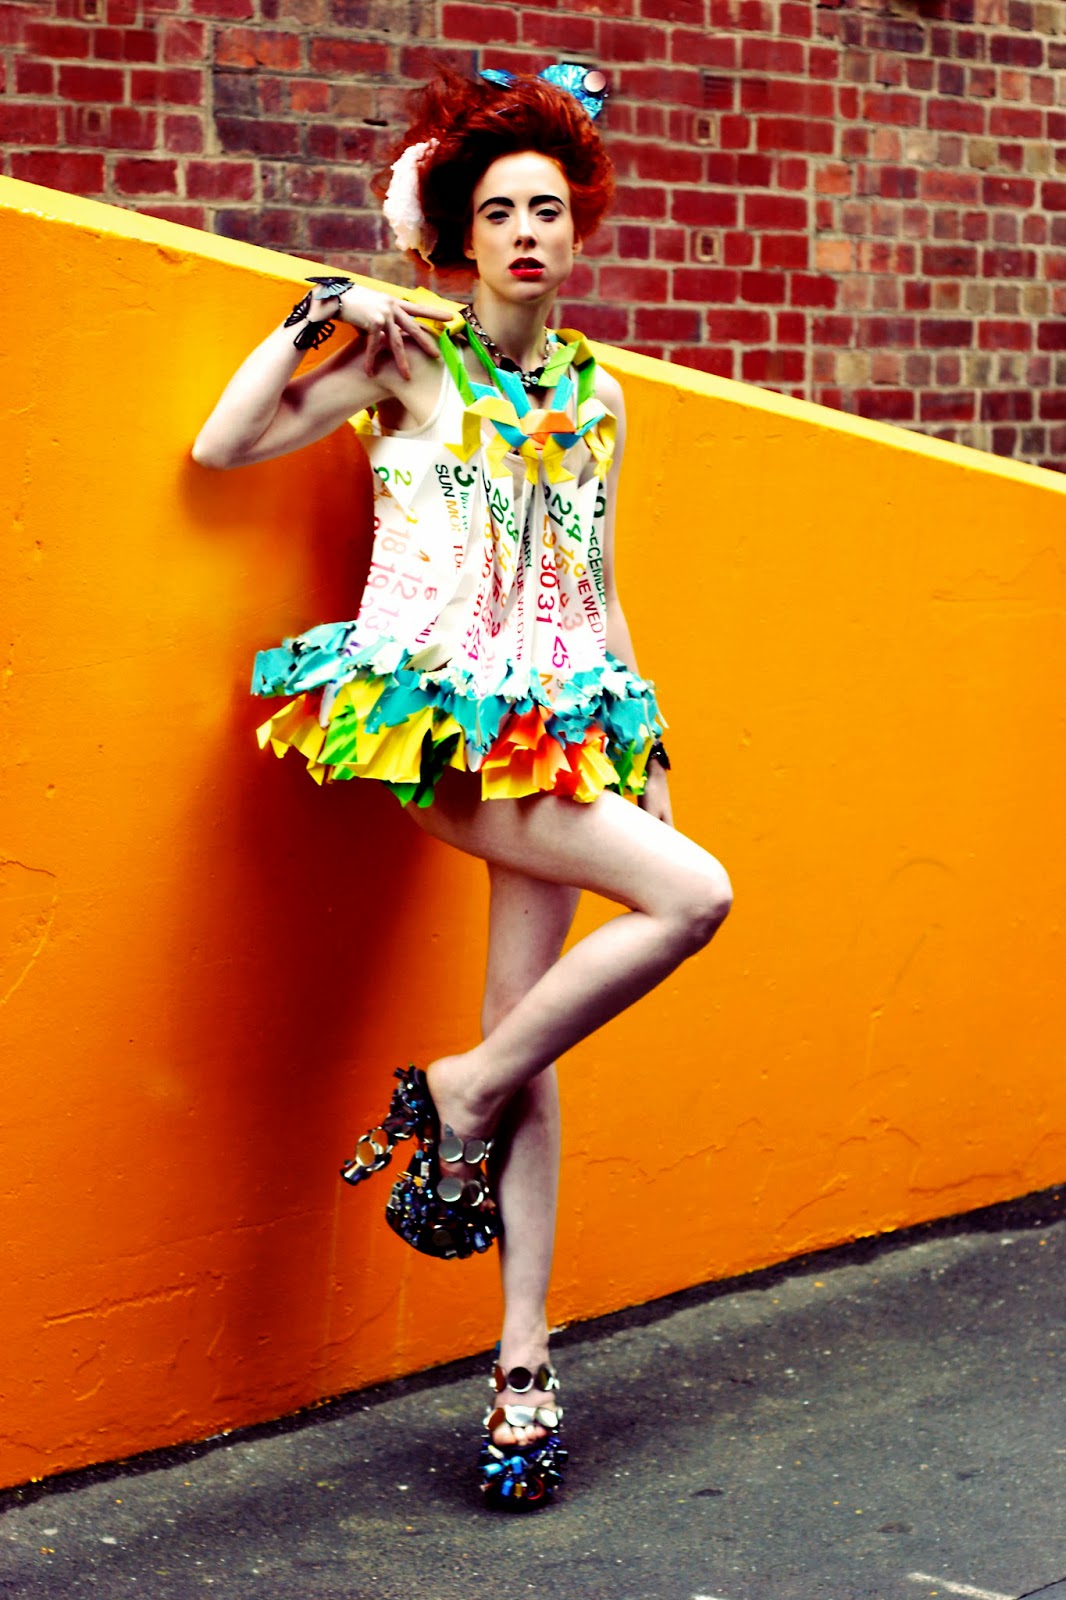
Published Collab Project: Renaissance d'Ordures

...this little project from long ago was more than heaps of fun...
photography by Jacinta | jewellery and accessories by Fiona (Gould's Finch fionacaripis.tumblr.com/)
garments and headpieces by Adel(taikensonzai), made from waste paper and trashed "enviro-bags"
shoes by Rose (rosebrinkley.com/)
models Carly and Ana (RIP)
make-up by Nicki
hair by Biba


Friday, April 15, 2011

Gorgeous Jacinta

Jacinta wears the upcycled electric violet tunic made from a second-hand 100% polyester tank top and ombre-dyed Thai silk scarf (also second-hand), trimmed with finger-knitted acrylic yarn cording...

Tuesday, March 22, 2011

Making and Re-making: a somewhat Photo-fanatical post

Pin-cushion with built-in pockets for bobbins, bobbin-cases, and feet, made from a shrunken beanie


Yes. Lots and lots of pictures. And an embarrassing confession: I keep my trusty little Panasonic camera on hand at all times, but am probably not as trigger-happy as an "aspiring blogger" should be.

And processing/editing/uploading/actual blogging takes a while too (held up by procrastination, of course).

Anyway, a little history of what went down not too long ago...

We did attempt to hold crafting/making sessions at the Richmond Library meeting/function room several times in February 2011, but sadly, the turn-out was rather low. Let's imagine a little tear rolling slowly down my cheek...was it bad timing, short notice, or Facebook being not quite the best way to organise events?

Ms. Bell the beading maestro in action

Even so, many thanks to Allison and Jackie (and Charani, for those few short moments) for coming by to keep me company while some of these projects were underway...perhaps one day Restructors will be able to hold crafting/upcycling/making jam sessions in real style...we can only hope!!!

Complete: little girl's multi-functional reversible pinafore/skirt with strap/sash options, made from remnents & scraps

Incomplete: reversible and dual-direction convertible hooded shrug-jacket with adjustable cuffs, turns into a scarf, also made from remnents and scraps


On a side note, documentation can be such a tiring process, isn't it? The creative working process needs to be evidenced in order to be exhibited, and the creation of evidence is another layer of labour unto itself. Thank goodness for this tree-saving online channel which renders the need for hard-copy printing unnecessary.

What is crucial about this documentation of processes is being able to show in a tangible form all the labour, diligence and thought that contribute to end-product creation.

Second-hand bright purple polyester tank top, approx. size 16, before destruction

Especially in the case of upcycling old/second-hand/discarded garments, where personally I feel a strong need to justify the act of destruction (cutting it up) and reconstruction, through the evidence. And this evidence must not only show experimentation and exploration, but also project a thoughtful and considered process which effectively involves eco-design and sustainability concerns.

Reconstruction stage: ombre-dyed second-hand Thai Silk scarf attached to tank, followed by attachment of finger-knitted acrylic yarn cording as trim, sewn on by hand...

I have to stress that by no means is this a perfect or flawless process, and honestly there is a huge amount of stress to produce an end-result with certain levels of wearability and aesthetic quality. Already, considering cradle-to-cradle fabrication standards, attaching silk to polyester/acrylic could be a big mistake. However, the deterioration of the silk fabric with wear and tear, contrasting in texture and sheen against the polyester over time, would be an intriguing process in itself...

Jackie models the reconstructed but incomplete tunic

The result is an asymmetrical garment that appears to have a different weight on the left and right side, resulting in one sleeve seeming longer than the other. Not having a discernible front or back (which was the intention) could make for an interesting, albeit disorienting, experience for the wearer...and the drape effect was a pleasant surprise.

Does it work? Is it too bulky? Is it ugly? Should more be done?

Another question: was this truly zero-waste? Not exactly. More like "minimal waste"; as in the process of unpicking the side seams and sewing on the silk scarf, some bits had to get trimmed off.

The doubts (one of many) lingering with this garment at present is when to stop; whether or not to insert drawstrings into both the sleeves so as to be able to adjust their length and the overall proportions of the garment itself.

What do you think?

Another line of exploration I have been trying out is arguably a process of "re-fabrication", which is essentially geometrically organised collaging of cut-up fabric scraps from sample books and remnents to form a whole new piece of material to work from, largely inspired by quilting, which was one of my late paternal grandmother's greatest skills.

Good collage or bad collage?

The issues here, outside of colour coordination headaches: combining synthetics with naturals (potential care/maintenance problems galore), construction (lots of bulky seams), and TIME. This process is experimental, excruciatingly slow/tedious and gets increasingly difficult as the size of the composite expands.

I am not even sure this is the best possible configuration of shapes, and probably never will be. The possibilities at this stage are already endless. And then, after these 2D shapes are sewn together, what 3D garment can be sculpted from this quilted piece? More possibilities...

Monday, January 10, 2011

Family Reunion

Finally all the Mutant Baby Doilies are together again.
It's a totally wicked family reunion party!


They are "the Evil Eleven"...
We had fun giving each of them quirky names. (Allison's good at spontaneous naming ceremonies.)


The How-to Recipe can be found in a previous post:


...to be continued...

Wednesday, December 15, 2010

Crazy Christmas Crafting

 
Seeing Papier d'Amour's old book-page paper wreath in Real Living Magazine has sparked off a wreath making craze especially since the whole world seems to be gearing up for Christmas madness!

I didn't even bother with Googling (though you will find lotsa eye-candy!) for DIY guides or instructions, but went for it instinctively, like the gutsy, impulsive craft-o-maniac I am. But if you like, this shows a how-to...

Basically, you need a circular doughnut-shaped base, strong glue, or strong double-sided or sticky tape, or perhaps stapler/staples, whatever it takes to make the paper attach to the circular base and not come off when the finished product is hung.

I do not have a glue gun (would be interesting to yank one out of my behind or out of my hip holster every time I needed one though!) so it was a pain to find enough super glue to make the rather large wreath I ended up with. (It measures around 60 or 70 cm across in diameter, yet another uncalculated result.) Having masking tape and a large stapler/staples on hand helped A LOT.

I ended up spending around $40 on the whole thing; half of the money went into getting the glue alone. The rest I spent on the tinsel ribbons and a small amount of pretty overpriced matte and metallic wrapping tissues and wrapping paper; also a roll of cellophane which I thought to use to wrap around the whole thing as dirt/weather protection eventually, but maybe not...

It was a good thing that I had ready and free access to heaps and heaps of discarded packing cardboard! And of course my own personal stash of cords, ribbons and trims to use when needed.


You need lots of loose paper pages, which can be twisted into loose or tight cylinders, cones, fans, ribbon shapes, loops, gathered and shredded, cut into cool shapes, made into 3D stars, whatever rocks your boat...but processing the pages can be tedious and repetitive...think of it as a calming therapy. I gathered the pages roughly after folding once diagonally, so no nice coiled cone formations in my wreath...


All I had on hand was an old issue of Marie Claire magazine (with Kristen Stewart on the cover, fancy that) and I knew that glossy magazine pages will have no colour consistency, unlike old book pages, so I was seriously considering getting a can of red or green sparkley spray paint to create a more consistent colour.

What I tried to do was make sure dark and light coloured pages were spread evenly about and mixed well with brightly coloured pages...though come to think of it, perhaps having a gradient of light-to-dark colours might be cool. Hard to achieve though! To create an even fullness, you need to spread the bunches around at intervals and slowly fill in gaps.


So the crazily textured result...


I keep wondering whether it looks too junky. Certainly looks rather insane!


And a couple more...

 From cardboard boxes used to package organic vegetables, and the inner tube of a roll of wrapping paper...

This one was for Sprout, an awesome health food shop and cafe next to where I work...


And a little over one issue of Grazia magazine from/for Tedesco III turns into...

Tuesday, October 12, 2010

Upcycling idea: Making a book-cover out of a MSFW (Melbourne Spring Fashion Week) show bag

Something I did recently to make myself feel better after losing my sketchbook full of 2010 design ideas and drawings. A nicely covered, relatively weatherproof and 'hard-covered' new sketchbook which I dearly hope will never get lost!

What I had on hand:
Scissors
Sewing thread
Needles
Pins
A slightly damaged MSFW 2o10 showbag printed with cute Gorman designed graphics
Masking tape (on hindsight double-sided tape would have worked better)
Ruler


If you find yourself wondering what the hell to do with those yucky freebie polypropylene 'enviro' bags that keep getting pushed in your face, consider using the material to protect and cover a treasured book. The material is quite water-and-tear-resistant...plus you can embroider it or print onto it to create something more aesthetically pleasing. Considering how non-biodegradable the material is, it seems wiser to put the stuff to further use instead of sending it to landfill once the bag's seams come apart (which does happen quite quickly doesn't it?)

On another note, this is such a symbolic object of abuse and green-washing, isn't it? All the big brands are just jumping on the bandwagon and producing them by the millions to use as marketing collateral. Have you ever wondered how much more resources are wasted producing these bags as compared to paper bags? Not to mention the carbon footprint, greenhouse gases produced, toxic chemicals used...